Sunday, December 4, 2011

Whole Wheat Bread - Soooo Delicious!

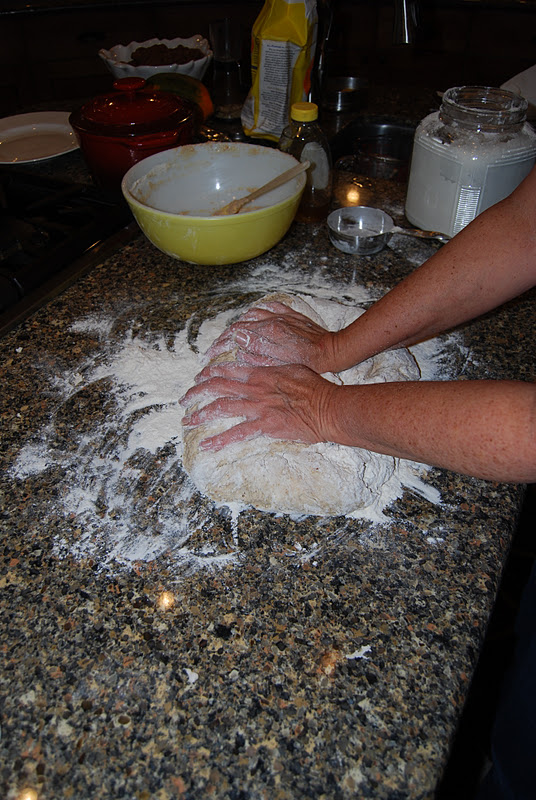
I have been making this recipe for years.  I don't remember where I got the basic recipe but I have changed it as I learned what works.  This comes out well with great texture and the flavor is pretty good. I took photos as I went so you can see what it should look like as you progress.

Ingredients:

4 cups water heated to 110 to 115 degrees.
3 TBS Active Dry Yeast
1/2 Cup Honey
1/2 Cup Vegetable Oil
2 TBS Kosher Salt
1/2 Cup Wheat Gluten Flour
1/2 Cup Wheat Germ
2 Cups King Aurthur’s Whole Wheat White Flour
3-5 Cups Best for Bread White Flour


Directions:

1.  Dissolve yeast in warm water that is between 110 and 115 degrees.
2.  Add honey and stir until dissolved.  Let stand 10 minutes.
 
3. In large 4 cup measuring cup place 1 cup King Arthur's Whole Wheat flour, wheat germ, gluten flour, and 1 cup Gold Medal Best for Bread flour.  Add salt and stir until incorporated.

Yeast mixture should be bubbly.

4. Add flour mixture to yeast mixture and stir well.

5. Add oil and mix well.

6.  Add enough of the Gold Medal Best for Bread flour 1/2 cup at a time until dough is thick enough to turn out onto clean floured surface.
7. Sprinkle more flour on top of the dough and fold the dough onto itself and press down with the heels of your hands.  Turn the bread 1/4 turn and repeat the process.  If the dough is sticky add more flour 1/4 to 1/2 cup kneading by folding and pressing for about 10 minutes or until dough is not longer sticky.  Flour the surface as needed so that the dough doesn't stick to it either.

8.  Form dough into a ball.
9.  Pour a small amount of vegetable oil into a large mixing bowl. 
10.  With your hand spread the oil around the bottom and sides of the bowl.
11.  Place the dough in the bowl and then turn the dough upside down.  This will make sure that the dough gets oiled on both sides.  This helps keep it from sticking to the cloth while raising.
12.  Wet a clean dish towel with hot water and wring it out well.
12.  Place the dish towel over the bowl and place in a cool oven with the oven light on.  Let dough raise until double in size.  This can take up to an hour.  If the dough raises too fast you can punch it down, press the air bubbles out by kneading the dough for a minute.  Form back into a ball, place in the bowl, cover with cloth and let raise again.
13.  Spray with vegetable spray four bread pans.
14.  After dough has raised remove from bowl and knead the air bubbles out for about a minute. Spray the work surface first with vegetable spray or brush with vegetable oil so the dough won't stick to it.
15. Form the dough into a ball and cut it in half.  Then cut the halves in half to make four balls.


16. Roll with a large rolling pin a piece of the dough working out the bubbles.  Try to roll the dough to the size of the baking pan.


17.  Begin at the furthest edge away from you and roll the dough towards you.  With each roll press the dough into itself. When finished rolling the dough seal the edges and tuck them under forming a roll.


18.  Place the roll of dough into a greased bread pan and press down slightly.
19. Let raise until double in size without covering.  Spray tops of loafs with cooking oil to keep from drying out if you are in a dry climate.
20.  Bake at 350 degrees for 55 minutes.  Bread should be crusty on top and golden brown. 
21. Remove bread from pans as soon as you take them out of the oven.  Let the loafs cool on cooling racks and then bag them in plactic bags.  Can be frozen for several weeks.  But I always eat them right away, within a week.  We love bread at our house as you can see. Makes four large loafs.


21. Slice and eat!  Enjoy!


Saturday, December 3, 2011

Shortbread Cookies:

I got this recipe from www.joyofbaking.com. The one thing I needed to do was let them bake longer and make the cookies a bit thicker than the recipe says for high altitude.  When slightly browned, (don't over bake or brown), they seem to not break as easily. 

2 cups all-purpose flour
1/4 tsp salt
1 cup unsalted butter, room temperature
1/2 cup confectioners sugar
1 teaspoon pure vanilla extract

Beat butter in a bowl with an electric mixer until smooth and creamy.  Add sugar and beat until smooth. Add salt and vanilla and blend well.  Gently stir in the flour until just incorporated.  Flatten the dough into a disk shape and wrap in plastic wrap.  Chill for an hour or until firm.

Preheat oven to 350 degrees. Line two baking sheets with parchment paper. 

On a lightly floured surface roll the dough into a little more than 1/4 inch thick circle. Cut into rounds or shapes with a lightly floured cookie cutter.  Place on prepared baking sheets and place in the refrigerator for about 15 minutes.  Bake for 8 - 10 minutes (high altitude for 12) or until cookies are very lightly browned.  Cool on a wire rack.

For Chocolate Dipped Shortbread;  Place 3 ounces of finely chopped good quality chocolate in a double boiler.  After chocolate is just melted and smooth remove from heat.  Add 3 more ounces of shaved chocolate and stir with wooden spoon til smooth and glossy.  Taking one cookie at a time, dip one end of each cookie in the melted chocolate and place it on a parchment lined baking sheet.  Once all the cookies have been dipped in the chocolate, place the baking sheets in the refrigerator for about 10 minutes or until the chocolate has hardened.

Shortbread cookies will keep in an airtight container for about a week or they can be frozen.

Makes about 2 dozen.

Home Made Nutty Granola

I've always wanted to make my own granola.  I looked at several recipes and then came up with this.  Let me know if you like it!

4 cups rolled oats
1 cup wheat germ
1 cup chopped walnuts or slivered almonds
1/4 cup sesame seeds
1/2 cup pomegranate infused craisins
1/4 cup organic date pieces with organic oat flour
1/4 cup chopped dates
1/4 cup pumpkin seeds
1/4 tsp kosher salt
1/3 cup vegetable oil
1/3 cup brown sugar
1/3 cup honey
1/3 cup water

1. Heat oven to 300 degrees. In a large mixing bowl, stir together the oats, wheat germ, nuts, sesame seeds, craisins, dates, pumpkin seeds, and salt.

2. Make a well in the dry ingredients and add the oil, honey, and water. Toss the mixture until the ingredients are well combined, then spread it evenly on a cookie sheet.

3. Bake the granola for 40 minutes or until lightly browned, stirring every 10 minutes to keep the mixture from sticking. Let it cool completely, then stir in the cranberries or dried fruit.

Friday, November 4, 2011

Vegetarian Tamales, Yummo!!!

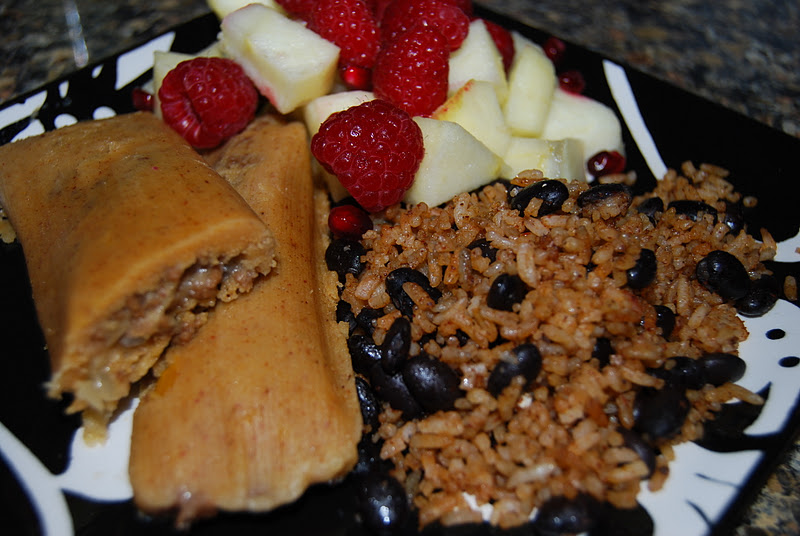
My daughter, Callie, learned to make these awesome tamales.  While we were visiting my folks in California we made a bunch to put in GG's freezer.  Callies girls also like them a lot and can't get enough of them.  So I tried them at home and sure enough my Grandsons and the rest of the family love them too!  If you're not vegetarian you can put whatever filling you want in them and they will be awesome.  So here is the recipe that Callie got from http://www.mommiecooks.com/2010/12/17/vegetarian-tamales/ .


1 Pkg. of Corn Husks
2 Cups of Masa
1 tsp of Baking Powder
3/4 tsp of Salt
2 tsp of Cumin
2 tsp of Chili Powder
21/4 Cup of Veggie Broth
1 Stick of Butter

Start off by soaking your corn husks in water for at least 30 minutes.
Grab a bowl and add in the masa, baking powder, 1/2 tsp of the salt, and 1 tsp of both the cumin, and chili powder. Now add 2 cups of the veggie broth to your mixture and form a dough. Pop your stick of butter into your mixer and whip it up for a minute or so. Add the masa dough in and mix it up well again.
Set your finished dough aside and let's move on to the filling. The basic tamale recipe is what we use and then we came up with our own filling.  The filling recipe is:

Two bag of Morning Star Farms Meal Starters. (You can use whatever brand of textured vegetable protein you like. Sometimes I use Loma Linda Vege Burger. It is like a crumbled burger.
You can use 2 pounds shredded chicken or 2 pounds of browned hamburger in place of the vege food if you want meat filling.)

1 Onion chopped fine
1 Red, Yellow, or Green Bell Pepper chopped fine
2 T oil

Saute onion, pepper and burger in oil until onions are clear. If you want some kick to your tamales you can add 1/4 Tsp Cayenne Pepper or Chili flakes or more depending on how hot you like your food.)
2 c. shredded mexican cheese. 

Set up the counter with the Masa dough, burger, and cheese in an assembly line. I lay down a tea towl and lay a corn husk on the towel while filling and rolling.  Drain the husks and put at the beginning of the assembly line. Tear strips of a couple of husks about a quarter to a third of an inch thick for tying up the tamale rolls when ready.

Lay a corn husk scoop a small amount of Masa dough in the center of a corn husk.  (About a large tablespoon or so.)  Put a tablespoon of burger down the middle and sprinkled a small amount of cheese on top.  Roll the husk in half so that the Masa surrounds the burger and finish rolling like a burrito. Fold the bottom up and tie it in place with a strip of husk.

To cook I used my spaghetti strainer and set in in a big cook pot.  Stand up the tamales and place water in the bottom of the pot up to the bottom of the strainer.  Cover the pot with tin foil to seal it so the steam wouldn't escape and steamed them for 90 minutes.  Put some uncooked tamales in the freezer for later steaming.  A double recipe of Masa dough and the filling from above will yield around 50 tamales depending on how big you make them.  Enjoy!

Thursday, October 6, 2011

Spa Day


When I decided to come visit my folks I called my daughter Callie and asked her if she would like to come along.  She jumped at the chance to get away from the daily grind and spend some time with me and the Grandparents.  I asked her if she wanted to have a BAGS Day (A tradition started by my Sister-in-law's family) by going to the Spa. OF COURSE!  So I called and made appointments for me, Mom, and Callie.
I was so excited for Spa Day with Callie and my Mom that I forgot my camera.  So Callie took pictures on her I Phone.  At least you will get the idea.  The actual Spa pictures are from their site. We went to Sandlewood Spa in Nipomo CA.  You can find out more about what this spa has to offer by clicking on this link www.sandlewoodtrilogy.com/sandlewoodspa/welcome.htm.

We arrived at the spa and were escorted to the relaxation lounge.  On the way we were given a brief tour of where everything was.  We had lockers with robes and sandals and a dark chocolate butterfly sitting on top of the neatly folded clothing that sits in the  bottom of the locker.  There are plush towels everywhere for use at the different areas like the sauna, hot tub, and showers.  Mixed nuts, dried fruit, and snacks were available next to a water urn with lemon water.  Hot tea is served to you on request.  They bring it right to you in a cute tea pot with a honey straw.  The tea was really good.

We had the Manicure Pedicure package. Mom went first and while she was getting all relaxed in the Pedicure chair Callie and I donned our suits and went to the hot tub which was located outside in a nice private garden area.  The water was warm and relaxing.

Once in the Pedicure Chair Nikki, the nail technician, soaked my feet in warm soapy water.  She rubbed each foot and leg with a pumice cream to exfoliate the skin and remove dead dryness.  Then after rinsing she wrapped each foot and a plastic bag and covered them with warm booties that she took from a warmer.  Then she massaged each foot and calf before trimming the nails, shaping, removing unwanted cuticles. She put on the polish of our choice in several different layers of conditioning, color, sealer, and quick dry.  My skin felt soft and my toes were painted better than I could have ever done.  Plus this lasts a whole lot longer!  I got the same treatment for my hands and forearms.

Nikki said, "I'm slow but then you are at a spa so relax and enjoy!"  It took about an hour and a half.  They served me tea while I was getting my Pedicure.

Next time I come, and I will be coming again, I think I'll try the massage or the facial, or maybe do a package thing.  What I do know for sure is that every woman should do this sometime in her life even if it is once a year (better yet, once a month).  We work hard and take the stresses of our family.  We try to keep things going and on an even keel.  For me to do that I need to take time once in awhile to just totally relax and let someone take care of me.  We are already planning another BAGS Day for next year and hope Casey will be able to come too.

Saturday, September 10, 2011

Yummy Peach Tarts

What you will need:


1 package Pepperidge Farms Pastry Puff (thawed overnight in refrigerator)
1 large fresh peach (I used Palisade peaches)
1 to 2 T honey (depends on the sweetness of the peach
1 T craisns
1 tsp corn starch
1 tsp flour
1/4 tsp cinnamon
small pinch salt
butter
1 egg beaten

What to do:

Peel, pit, and chop into small cubes the peach an place in medium mixing bowl  Add honey, craisns, corn starch, flour, cinnamon, and salt.  Toss together lightly and set aside.

Sprinkle flour lightly on clean counter top or pastry cloth.  Place thawed pastry puff on floured surface and slightly roll out a bit so that you can get six rounds cut out with a 3 inch round cutter.  (Each box of dough comes with two sheets and you should be able to get six rounds out of each sheet.) 

Place a small amount of peach mixture in the middle of a round.  (Appx. a tablespoon or so)
Dot with 1/4 tsp of butter or less.  Beat the egg in a small bowl and use a pastry brush to brush around the edge of the bottom layer.  Place the top over the peach mixture and press gently the edges together of the dough.  Take a fork and press around the edges to seal the tart completely.  Use the fork to poke holes in the top of the pastry to allow the pressure to release while baking.  Brush the top and edges of the tart completely with egg wash and then sprinkle with cinnamon and sugar or raw sugar if you want. Cinnamon sprinkle is 1 T sugar to 1/2 tsp cinnamon.


Bake in a 400 degree oven for 25 to 30 minutes until tarts are golden brown.  Makes six tarts.
Cherry filled is pretty good too!

Monday, September 5, 2011

Relaxing in Prescott, AZ

Don and I, along with Greg and Denice, decided we needed a break from some intense work and dealing with daily life and opted to check out Prescott Arizona as a possible future retirement site (albeit, the economy will get so bad that we won’t ever be able to retire). So we loaded in the car and headed south through Albuquerque to catch I-40 through Flagstaff.  Flagstaff is an awesome town and I will talk about it in a later article.
Slide Rock State Park.  Nice swimming hole!
We took Highway 89 through Sedona which is an absolutely stunning drive.  We love the colors of the rocks and the formations, the beautiful flora, trees, and wildlife, and streams.  As one travels along the road it descends in elevation rather quickly into a canyon that displays all this beauty and empties into the town Sedona. Well kept, clean, and pristine the town is filled with artisans, retirees, the affluent, and those who believe that Sedona is the vortex of the universe or some such weirdness.  Lots of ESP going on there which leaves me feeling quite uncomfortable. However, there are excellent vegetarian restaurants with all types of menus. 
Cottonwood, another town on the route slightly south and west of Sedona, is another option for one wanting to retire with more mild temps but still like the cool with a lightly higher elevation.  Clean and middle class it was pleasant to drive through.


Seventh-day Adventist Church in Prescott.


Panoramic View of Prescott

Panoramic View of Prescott
A real surprise, and one we really want to revisit, was Jerome.  This is a town built literally on the side of the mountains.  Quaint shops and restaurants now live in the historical buildings once occupied by miners and those services that kept the mining town running back in the day.  It was awesome to drive through and wish we had time to stop.  But as I said, we will come back!
A high school classmates of Don's, Russ Palmer. We visited his
home in the southern hills of Prescott. Beautiful place!
Prescott is a beautiful place set partly on the side of the hills and valley.  There are several small towns within a few miles of each other including a somewhat newer looking Prescott Valley.  Anyone with any desire to live in this area, can.  Many of the housing areas have HOAs (Home Owner Associations).  If you don’t mind a corporate group telling you what you can do with your land and home and also paying dues than these places can be quite nice.  However, there are many other places that don’t have HOAs.  And now is also a good time to buy as the housing market has crashed and the prices are more than reasonable on many offerings.  There’s many different ranges of homes from multi-million dollar, 6,000 sq ft. homes to 700 Sq Ft homes for $30,000 or so. 

Because it was Labor Day Weekend there was a street fair going on in the courthouse town square.  I was told by a local that they have big “dos” throughout the year and they are well attended.  He was right!  Lots of booths with a variety of art, jewelry, pottery, furniture, clothing, and various cuisines.

It took about 2 hours to get through.  On one side of the square is “Whisky Row” where all the saloons and bars are.  On the opposite side of the square is antique row with shops galore to browse through.  I found some silver coins and a pedestal cake plate for pretty descent prices.

We ate breakfast at SuAnn’s Apple Pan.  The food was really good with great omelets, “Marks Fried Potatoes” , light and fluffy biscuits.  Denice got a homemade cinnamon roll but I thought it was a bit dense though the flavor was good. The décor was all “Apples” and stuff –kind of late eighties and nineties.  The prices are very reasonable and by the time we left there was a substantial line waiting to get in.  That’s always a good sign.

My favorite place was a small Bakery called Grama’s.  Grama said she had been there over 20 years but didn’t know exactly.  The store is located on Gurly Street.  She doesn’t have a website or email.  She says she doesn’t time.  When I asked if I could take her picture she said she was usually a very private person but she allowed me too because of my blog.  Even private people don’t say no to free advertisement.
Grama!
She doesn’t post her prices.  She doesn’t have to.  People who go there know what to expect and are willing to pay because she is an excellent baker.  Her offerings are totally homemade and fresh out of the oven!  I bought a Lemon Crème Napoleon and Raspberry Crème Napoleon that were to die for.  She has “Grama’s” Big Cookies, Bear Claws, Apple and Cherry Turnovers, Cinnamon Rolls, various pies and more.  I’m sure her fare changes each day and she keeps some of the classics.  I wanted some of everything. She only accepts cash!  She doesn’t want to deal with credit card machines and bounced checks.  “I don’t have time!”
Delicious pastries homemade by Grama.
Though she may seem unfriendly and very busy, she really is a nice person.  She is just hard working and when I mentioned retirement she said, “Oh, I will never do that!”    There is one table with six chairs or you can walk a few paces to the square and relax on one of many benches or the steps of the courthouse and luxuriate in homemade goodness.