Tuesday, November 15, 2016

Butter Cream Roses for a 93rd Birthday

Made this cake for a lovely lady, Midge (short for Midget because she is short). Her real name is Yolanda.  She worked until she was 89 at a local laundry mat.  She is an amazing woman and I was thrilled to help her celebrate her birthday.

I made the roses with butter cream on marshmallows and sticks. This makes the flowers stay better when you put them in the cake.

I also did the first multi-color frosting as the base and the trim on the cake.  It was really fun and Midge was really happy with it.  Happy Birthday girl!  You rock!!


Waterfall Outdoor Cake

We are house sponsors for La Puente volunteers. These are generous kids, young adults, that work the homeless shelter and other entities, such as, the food banks, PALS kids program, Adalente, and so much more.  They work hard!  When Brian heard I made cakes he wanted me to make him one.  He loves the outdoors so I made him a waterfall cake.  It's a single tier cake made with vanilla cake and buttercream filling. Needless to say he was super surprised when I made it for him.  Love making people happy!


NFL Bronco Birthday Cake


I made a birthday cake for a friend of mine who wanted to give it to a friend who was celebrating her 70th birthday and loves the Bronco football team. I made a three layer cake and "glammed" it up a bit because it was for a lady. I love the way this cake turned out.


I made a round disc of thin gum paste.  Thin enough to be able to see the outline of the Bronco Logo.  Then I drew it on with food coloring slightly watered down with Vodka.  The Vodka evaporates and leaves the logo looking great.


Two other techniques I tried on this cake that I haven't done before and that is edible lace which I used as the blue border at the bottom and butter cream roses made on marshmallows. Just click on the links for the tutorials.  I found them very helpful!

The cake is Old Fashioned Butter Cake with chocolate ganache filling. The recipe is below.


Old Fashion Butter Cake

2 cups all purpose flour (measure after sifting)
1 1/4 cup granulated sugar
1 tablespoon baking powder
1 teaspoon salt

1/2 cup butter, softened (Use salted butter or add 1/2 tsp salt to recipe)
1 cup milk
1 teaspoon vanilla extract

2 large eggs - room temperature
High Altitude Adjustment: add 2 tablespoons flour to the 2 cups of flour, cut sugar back to 1 cup, cut baking powder to 2 teaspoons, and add 2 tablespoons milk to the 1 cup milk. Follow the directions below.

Preheat oven to 350 degrees (F) or 325 degrees (F) for high altitude.

Grease and flour two 8 inch by 2 inch cake pans and set aside. (I use parchment paper cut the size of the bottom of the pan to help the cake not stick and come out easier.  First spray the cake pan, lay in the parchment, spray again and then flour.  For the right cut of parchment just set the pan on the parchment paper and draw around the base.  Cut it out and it fits perfect.)

In a large mixing bowl sift together the flour, sugar, baking powder and salt.  (Yes, this makes the second time you sifted the flour. I sift the flour before measuring and again when combining the dry ingredients in a large mixing bowl.)

Add butter, milk, and vanilla.  With a hand or stand mixer, beat for 2 minutes, occasionally scraping down the sides of the bowl.

Add the eggs one at a time until just blended, then beat for 2 minutes more.

Divide batter equally between the two pans. Spread with spatula and then lightly tap the pans on the counter to let up any air bubbles.  Bake for 30 to 35 minutes (40 to 50 minutes for high altitude). If you put a tooth pick or knife in the center it should come out clean. I use a knitting needle.

I use cake boards that I buy at Walmart to fit the size of my cakes.  As soon as I take them out of the oven I carefully run a knife around the edges.  Then I place my cake board over the top and turn out the cake gently banging it on the counter.  I know that sounds rough, but it works.  I do this hot because all of the moisture hasn't escaped yet during the cooling process. Then I cover it loosely with commercial grade or heavy plastic wrap.  If you cover it too tightly the heat will cause it to pull in the edges of the cake.  Let it cool that way and than put a second layer of plastic wrap around it and put it in the freezer for a few hours or until you need it. Using this method keeps the cake moist and it is easier to frost when it is cold. (You can frost it as soon as it cools too.....you don't have to wait if you're craving dessert!)

Chocolate Frosting

1 stick butter (1/2 cup) melted
2/3 cup cocoa powder
3 cups powdered sugar (confectioner's sugar)
1/2 cup half and half
1 teaspoon good vanilla

Melt butter.  Stir in cocoa.  Alternately add powdered sugar and milk, beating on medium speed to spreading consistency.  Add more half and half if needed.  Stir in vanilla.  Makes about 2 cups.

I let the beater really work on it for at least five minutes.  Makes it really glossy and spreads well.

Wednesday, September 21, 2016

"Life is Like a Box of Chocolates" Cake


I was asked by the La Puente Board, the overseers of the homeless and disadvantaged programs, to make a cake for their fundraiser ball to support the Adalente program.  This program helps people get back on their feet by helping secure jobs, housing, food, schooling, and much more.  It is a very worthy cause so I said I would donate a cake.

The invitation to the ball was in Zebra print so that is the bottom cake.  The second tier is a gift box all glammed up.  The third tier is a gourmet box of chocolates.  

What I did first was to make different flavored chocolate truffles.  I made coffee/mocha, mint, cherries, almond, and chocolate.  I bought a candy mold and candy melts at Wal Mart and jumped into practicing.  I always look for You Tube tutorials and found several that show how to make filled candy chocolates.  This took me all day to do because my mold was small and it takes lots of patience. 


I made sure to taste! I didn't want to taste too much so that I would get sick of the candy.  As each batch was done I labeled them on a cookie sheet.  Then I glued nuts, coffee means, and painted edible dust to indicate what each one was.  The mint ones I swirled a mint green in the mold and then put the chocolate candy coating in and the affect was stunning.
I made the flowers out of gum paste and painted them with petal dust.  I glued stamens and pollen pods in the center to make them look more real.
The tiers of cake were made of decadent chocolate cake with chocolate ganache in the center.  One layer had raspberry filling.  I used chocolate ganache and chocolate butter cream frosting to crumb coat the cakes.  Yes, the box on top is chocolate cake with coffee/mocha chocolate ganache filling.  
This cake was expensive to make and took several weeks to complete.  I think it is a beautiful cake and it raised $800.00 for the Adalente program.  Those that bought the cake took it to the homeless shelter and shared it with the guests.  How often to they get fancy cake?  I thank God for making it all work out just right.  I also thank my husband, Don, for making the cake structure, moral support, and official taste tester!


Wednesday, July 13, 2016

Winema's Topsy Turvy Birthday Cake

My dear friend, Winema, had her 40th birthday last week.  It was a wonderful party with lots of family and friends.  Her mother gave me a call several months ago and got on my calendar to make an elegant cake with chocolate throughout.  She said I could do whatever I wanted so I chose a Topsy Turvy cake in black and white. I had the chance to practice on a single tier cake which I put in a previous post.  This cake, however, was more of a challenge. I used fondant from Walmart.  Usually I don't have problems but it kept tearing when I tried to put it on.  I really got frustrated.  I used the molds to help me cover some of the defects and it turned out pretty well.  
The other issue was structure.  Because the cake is supposed to look "wonky"  it was hard to know if I had it level to put on each tier.  I have decided to get a small level just for cakes like this.  Don helped me with the structure and found some hardware that had a flat circle on top and screwed over my dowels.  This helped the dowels to not poke into the cake board and sink.  I used a center structure that you can add to.  It was made of plastic and came in several sizes to fit the sizes of each tier.  Got those at Walmart too.  I believe they are from Wilton so you can order those on line.
I had difficulty finding tiered cake structures for this cake.  Then it hit me that it is wedding season and so everyone was looking for them.  I should have planned better and ordered on line more in advance.  Don is a great help with structure and fixed me up very nicely and the cake was very stable.
They loved the cake, so with all the grief it gave me it was a success.


Happy Birthday beautiful lady.  So proud of you!


Wednesday, June 22, 2016

Retro Birthday Cake (70's)


My friend, Kelsey, had a birthday a couple of weeks ago but she was out of town for a bit.  When she returned I had her over for dinner and a special birthday cake along with a few of her friends.  It's a basic chocolate cake covered with fondant and decorated in her favorite color, purple, which I didn't know when I made it.  So fun!  Happy Birthday Kelsey! 

Wednesday, May 18, 2016

Sunshine Cake for Sunshine School

My Granddaughter is graduating from Kindergarten and the school asked me to make a cake for their class of 2016.  The name of the school is Sunshine Christian School so of course I had to make a big sun. 
 
There are five students so I sculpted all of them.  I also made a tree, sun flowers, and fluffy clouds.  The sun is lemon cake with lemon buttercream filling.  The middle is marble cake with chocolate filling, and the bottom is chocolate cake with chocolate filling.
 
I have made a sunshine school cake before for my Grandson.  It was a flat sheet cake with the sun, school, and all the kids names written in the sky. 


This is my Granddaughter Cate.

Wednesday, May 4, 2016

Cinderella Cake for Lizzy's 2nd Birthday

Lizzy, my youngest granddaughter, was two on May 3.  She stays with me during the day while her siblings go to school. After lunch we sit on the couch and watch Pete's Pond or a cartoon before going down for a nap.  Casey, my daughter, gave her a choice of movies to watch on her cell phone.  She always picks Cinderella.  So of course I had to make her cake as Cinderella.

I enjoy doing this for the kids because I always add a toy of some kind to the cake and they have something to play with when all the cake is gone.

This Cinderella is a combination of the old traditional one and the newer one that Disney put out not to long ago.  Of course it went over super well!  All the kids, even the boys, were impressed! 
I used 8 inch round cake pans and made three round cakes.  I used a triple chocolate boxed cake mix. I baked one of the cake mixes in a Pyrex round mixing bowl that fit the bases.  After taking the cakes out of the oven I used a small cutter that I tried over the doll hips to make sure I was cutting the hole big enough but not to big.  I wanted it to be snug.  Then I wrapped the cake layers and put them in the freezer overnight.


I had some left over fondant from a previous cake order.  I bought it from Walmart as well as the doll. I live in a small town so it's either drive two hours to the city or order on line, but I found their fondant to be workable.  I colored it the right blue and kept some white for the ruffles and roses.  I looked up You Tube tutorials on how to make fondant ruffles. 

I wanted her shoe to show but the weight of the fondant almost covered it up.  Next time I will do it higher and lighter weight.

My crumb coat was butter cream frosting. The filling was chocolate ganache.
 As you can see my sweet Lizzy was enamored with the cake.  She loved it!  

Thursday, March 17, 2016

Star Wars Birthday Party

Three of my grandchildren have their birthdays in the first week of March.  This is the year for all the new Star Wars stuff coming out.  I tried to avoid making one of these cakes but in the end I relented.  I chose to do an Ewok tree.  As usual the grand-kids loved it!  
I found boxed chocolate cake and white cake for sale at a great price and couldn't turn that down so I made chocolate sheet cakes for the bottom layer and covered them with chocolate butter cream frosting.  That is also between the layers.

The top is made out of white cake with butter cream filling.  I used a wedding cake column and covered it with fondant to make the tree.  Don helped me put a flat surface on the top and screw both top and bottom into place.  It was really stable.  We had to take it in the car to the party location and it traveled well.
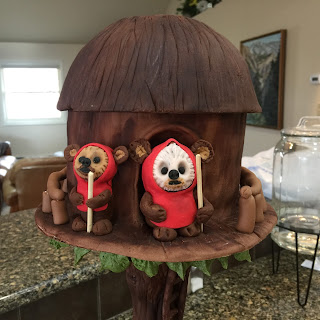
I used a small mixing bowl to form the hut roof with fondant, scored it with a blade, and painted it with petal dust.  I carved the top of the cake round so the roof fit nice and wouldn't slip off.

Wilton has some pretty cool grass sprinkles in two different colors.  I used that to make the cake look like a forrest floor.


Princess Leia and Yoda are made from fondant.  I made Luke Sky Walker holding a light saber but he fell of the cake and got ruined.  Need to watch my structure when placing figures on a cake!

Olaf Birthday for Teacher Casey

My daughter, Casey, loves the song "In Summer" from the Disney movie Frozen.  She is also a school teacher for K through 2. This year I asked her if she would like an Olaf cake and she about jumped for joy.

I made a coconut cake for the top layer and chocolate cake for the bottom layer with chocolate butter cream frosting. It was pretty tasty.  Just click on the links for the recipes

I made Olaf out of fondant.  I was going to buy a toy topper but they were all too big.  I think he turned out really cute.


What I really like is that Wilton has put out some cool party cake decorations that worked perfectly for the bottom layer.  I put enough on because I knew all her students would want some. I used coconut flakes for snow.


 Casey invited all her nieces and nephews to the party along with some of her students and little church friends. Instead of singing Happy Birthday they sang "In Summer"!  It was loads of fun and the kids including Casey really enjoyed the party.

Sunday, February 21, 2016

Custard Base Vanilla Ice Cream

Homemade ice cream is the best.  I have an electric ice cream maker that sits on my counter top.  It came with recipes that I have tried and are good.  The one I make most doesn't use eggs.  However, I kept hearing about eggs making the ice cream much smoother and, of course, richer.

I wanted to try a custard base ice cream recipe.  I found one on line from a site that I found my butter cream and fondant recipes. What'sCookingAmerica.net. If you click on the custard base link it will take you there.

This turned out very good.  It was smooth and rich and good flavor.  I used home made chocolate sauce and home made caramel sauce and sprinkled with chopped walnuts.  Oh boy howdy - out of this world. The recipe makes a small amount so double or triple it depending on the size of your ice cream maker.

Kaiser Rolls - Awesome for burgers!

I've been a a roll lately, pun intended.   I love Kaiser Rolls for burgers.  Since I can make my own wheat bread I thought I would give these a try, I mean, how hard could it be?

It wasn't hard at all.  They turned out fluffy inside and crusty outside.  You can use any kind of burger you want but I made a lentil burger which was "dyno-mite" according to my hubby.

I recommend toasting the buns lightly on a grill before filling with burger and veggies.  It is super tasty and helps keep the bread from getting soggy.

For the Kaiser Roll recipe just click on the link.  I found it on Taste of Home which has many yummy recipes that I have used in the past.

I'll try to get the lentil burger recipe up soon.  That is if I can remember it.

Saturday, February 20, 2016

Challah - Bread With Meaning


This is my first attempt at Challah, a bread the Jewish families make on Friday to welcome in the Sabbath with their meal.  They light candles, pray the Sabbath prayer with special blessings and enjoy a tasty meal together. Being Seventh-day Adventist I have kept the Sabbath all my life. My daughter, Casey, and I wanted to do something fun from another culture that would highlight the beginning of the Sabbath and so we did the Friday night Shabbat meal.

In order to be ready for the Sabbath all work is completed beforehand. Cleaning, cooking, shopping, business, etc. That makes it easier to sit and really enjoy without pressures to get things done. The TV is off to keep us from distractions. We set the table with candles, silver, and special plate settings.  I bought flowers to adorn the table. All this was done and ready before sunset.

I made the bread around early afternoon.  I discovered you can make the first part and then freeze it.  You need to let it thaw for 5 hours before baking. This is a very rich eggy bread.  I found the recipe posted by Joan Nathan, "My Favorite Challah". It yields 2 loaves. (This represents the two portions of manna that fell on Friday.)

I found on line a video that would show me how to braid the bread.  Just click on the link to watch.(The strands that are rolled to braid represent, arms intertwined, symbolize love, truth, peace, creation, freedom, harmony, family connection, unity and justice.)

Our menu was potato soup, salad plate, cheese, and of course Challah.

I did some reading about the Challah and discovered it is full of symbolism and meaning.  Certain forms of Challah are used for different occasions and holidays.  It is a "sacred" bread. The Jewish Faith doesn't much care for those who mess with this bread in other ways than originally intended.  It's main symbol was to represent the manna God gave to Israel during their years of wondering in the wilderness.  We talked about this at the meal. My grandsons were very interested in what manna was and how it was used.  It was great to find wonderful things to discuss at the table.

Don read from Isaiah 58:13, 14.  It is a perfect text for this type of meal.  He had a prayer and blessed our family and meal.  My oldest grandson also had a prayer and it was the most beautiful prayer I have ever heard him pray. 

I'm so glad we did this fun activity and I think we just may make it a tradition!  Shabbat Shalom!


Thursday, January 14, 2016

Camping Cake


A friend of mine is going to be quite surprised to get this cake tonight at her birthday party.  A group of girls are getting together to help her celebrate at the local Bistro in town.  When I first thought about this cake I was going to do Tulips or flowers for a woman.  But that didn't seem to sit well and I couldn't come up with a design.


One thing I have learned about cake making is that the cake is most appreciated when it reflects something about the person.  They appreciate it so much more and it suddenly becomes a memorable and special cake. This is a homemade chocolate cake that you can find the recipe by clicking on the link. The chocolate buttercream frosting recipe is below.
 
My friend loves the out of doors and camps a lot when the weather permits.  She also takes her beagle with her.  I tried my hand at making a dog and realized it was a terrible failure.  I went on line and found a tutorial on making gum paste dogs.  I watched it once at night when I was in bed and I could hardly wait to get up and make the dog.  This dog was hard because of the size.  He is very small and he doesn't look much like a beagle, however he is cute and makes the statement about my friend.
 
I like to have my cakes look good from all sides and I need to show this picture and her ponytail so you would know this is a girl!!!
 
I love the fire pit.  I used some gold sprinkles for "coals" and fondant for flame.  The marshmallows are fondant on match sticks.

Chocolate Frosting
1 stick butter (1/2 cup) melted
2/3 cup cocoa powder
3 cups powdered sugar (confectioner's sugar)
1/2 cup half and half
1 teaspoon good vanilla

Melt butter.  Stir in cocoa.  Alternately add powdered sugar and milk, beating on medium speed to spreading consistency.  Add more half and half if needed.  Stir in vanilla.  Makes about 2 cups.

I let the beater really work on it for at least five minutes.  Makes it really glossy and spreads well.